This post is also available in: Français (French)
![]()
Second article from our editor Lestin!
If you love theorycrafting and equipment, today he will guide you through Shield Generators mechanics.
Summary:
The Shield Generator
The shields are an important part of a ship, without being mandatory. There are many players, explorers or traders brave enough, or crazy, to fly without it. However, the Shield Generator can absorb potential shocks to not scare off your passengers or even to absorb some damage from your pirates or “not so great” landings. The shielding capacity of a shield is measured in megajoule (MJ) and this strength varies according to the types of damage absorbed.
These “Shield Generator” modules can be found from Class 2 to 8 (Certain Engineers sell C1) and Rated from E to A, while the bi-weave and prismatic shields are fixed.

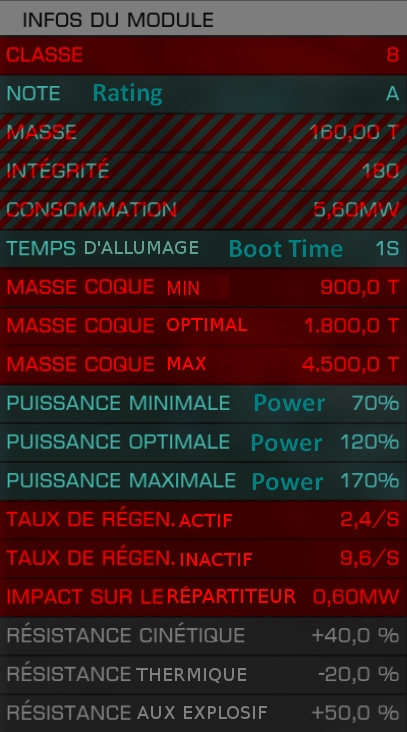
In the image on the right, we can see the different characteristics of a shield. The Class influences the values in red and the Rating those in blue. Resistances are all the same for each unmodified shields. Mass, integrity and consumption are not unique to the shield generator, each module has a mass, a capital of “health points” and an power consumption (draw). The shields have a performance index according to the mass of the hull. The closer your ship’s mass is to this one, the higher the capacity of your shield will be.
Example: a clipper with a 400-ton hull and a federal corvette with a 900-ton hull equipped with an optimal hull mass of 1060 tons, will respectively have 306MJ and 736MJ. The shield is so big for the clipper that it loses power.
Two points to keep in mind:
- The Power Distributor can increase the overall resistance of a shield, Nothing = 0%, ◘ = 15%, ◘◘ = 34%, ◘◘◘ = 45%, ◘◘◘◘ = 58%;
- Shield recharge is constant, whether it is active or recharging.
Finally, there are two variants that have opposite bonuses, the bi-weave Shields and the Prismatic Shields:
 Bi-weave shields, always Class C, have the distinction of having the capacity of a class D shield, about 2.5 times the regeneration of a class C shield and the mass of a class B shield. This shield has a purple appearance. It is ideal for single-target bounty hunting activities, including nimble vessels with a “Zoom and boom” gameplay. The recharge after being collapsed is very short thanks to its high regeneration. It can be differentiated from the sound it emits when it regenerates, more acute than that of a standard shield.
 Standard shields are more geared towards bounty hunting activities and conflict zones. It can also be used in trading and exploration to protect yourself to a minimum with a class C or D. When setting up the shield, it emits a very metallic noise.
 The Prismatic shields are the Empire reinforced shields, you will have pledged allegiance to Aisling Duval during 4 weeks and to kill a maximum of opponents. It is very expensive, but once in your possession you will be extremely well protected. The shield has 20% more capacity than a standard shield for a penalty of 50% regeneration time. It is also heavier because it has the same mass as two standard B class shields! You might think that this is not worth the effort, but thanks to the shield boosters and mods its capacity is greatly increased. If during a fight your shield is very low, it is better to escape, 4 pips to SYS because you can’t rely on its regeneration. The prismatic shield has a color that turns to green. When it is formed, you can hear a sound of electric current.
Additional modules
The shield generator can be combined with internal modules such as the Shield Cell , which allows partial or full reloading of your shields depending on its size. One can also increase its capacity with Shield Boosters which are placed on the utility slots.
![]()
The Shield Cell has several ammo that takes a few seconds to charge (spin-up time). The more efficient its cells are, the longer the reload time is, but it also increase the heat generation, so it is best to add a few Heatsinks, at least the same number of ammunition than the number of cells (Ram Tah can improve your heatsinks). Modifications can be applied to the Shield Cell to limit this heat generation. By activating a cell, it will strengthen your shield before reloading, so remember to use it if you are under enemy fire.
![]()
Shield Boosters are a good way to protect yourself by increasing the capacity of your shields against increased energy consumption. Class A gives 20% additional capacity for 1.2 megawatts and 3.5 tonnes. Having 5 of these boosters will double your shielding capacity for 6Mw. It’s a big price to pay because even the shields themselves do not consume as much: the biggest standard shield is the A8 with a consumption of 5.6Mw. Note that the regeneration speed is not increased, so regeneration up to 100% capacity will be longer.
Engineers, here to help
Three Engineers can help you modify your Shield Generator.
-

- Elvira – Rang 1 à 3
-

- Didi – Rang 1 à 3
-

- Lei – Rang 1 à 5
The various modifications allow to specialize your shield. Make it stronger against a weakened recharge, or increase the thermal resistance while lowering the kinetic resistance. Check out the Experimental effects as well to tweak your Shields.
- Reduced emission
- The shields will consume less energy, but the performance will be less good. It will also be less heavy, which makes this effect interesting for explorers or traders who have a shield limiting only superficial damage.
- Reinforced shield
- This change increases the maximum capacity of a shield by adding optimized mass and a certain bonus to each of the resistance. The basic regeneration speed of the shield is decreased, making it almost impossible to reload in flight for larger ships. In addition, its energy consumption is higher.
- Thermal or kinetic improvement
- This change will remove a certain percentage of resistance in one type to add it to the opposite type. You can increase your thermal resistance by sacrificing your kinetic resistance and vice-versa.
![]()
Shield Boosters have stats that engineers can modify to suit your playing style. Three Engineers can modify these for you.
- Here are three graphs. The first one is defined with the number of unmodified class A boosters on the x-axis, that will be our witness.
- The one below has a modification Resistance Augmented.
- Finally the last on the right has a mod Heavy Duty.
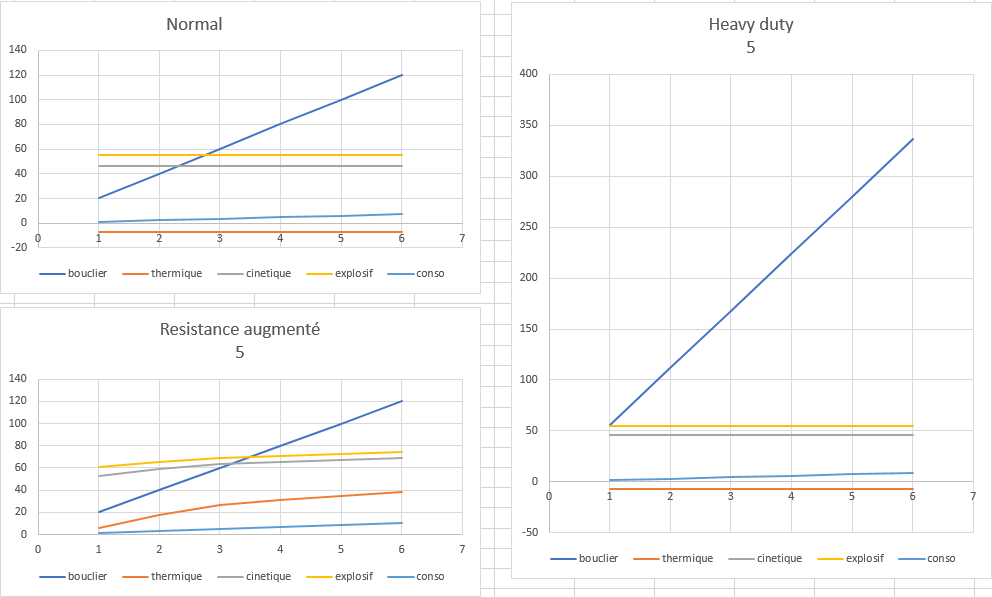 bouclier = shield strength
-

- Farseer – Rang 1
-
- Lei – Rang 1 à 5
-
- Didi – Rang 1 à 3
- Heavy Duty
- This modification is probably the most used, allowing you to enhance a Shield Booster A +20% (1.2Mw) to +56% (1.44Mw) with the mod rank 5. The performance is improved twice. Big malus however, the module is 3 times heavier.
- Augmented Resistances
- By coupling Heavy Duty to Augmented Resistances, the shield will be able to absorb even more damage without pushing the shields too high, which would make the shields very long to recharge. Generally 3 or 4 Heavy Duty rank 5 is enough, then fill with resistances.
- Thermal/Kinetic/Explosive Resistance
- This modification will favour a type of resistance by recovering the bonus from the 2 other types. For example, you can increase your thermal resistance by sacrificing your kinetic and explosive resistances. It’s a good idea to add a Thermal resistance if you can in order to balance with your other resistances and make your shields tougher.
To optimize your shields, I made a graph, let’s say for 6 Utility slots. On the x-axis, the digits correspond to (6-n)*Heavy Booster + n*Resistant Boosters. On the ordinate axis, the value of a shield and its resistances multiplied by a common factor. We look for the maximum of each value in order to know the ideal ratio.
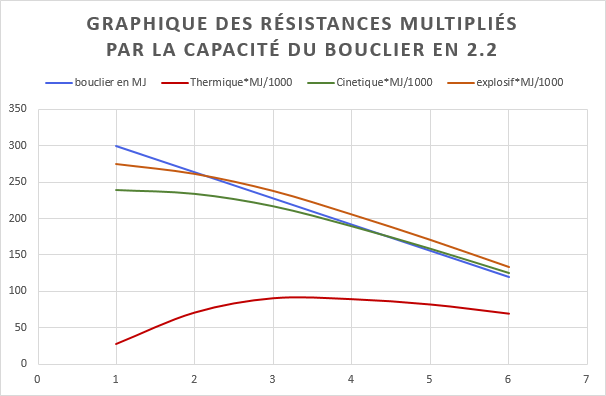
On the graph, we can notice that the maximum capacity for the thermal resistance is around 3 on the abscissa axis. With our formula, we must equip our ship with 3 heavy boosters and 3 augmented resistance boosters to hold the longest against the thermal weapons. If on the contrary we resist to kinetic or explosive weapons, the maximum of these two curves is 1.
The same exercise is repeated to obtain an equipment of 4 heavy boosters and 2 boosters with increased resistance. On the graph, we can see that the shield’s capacity in Mj is decreasing, which means that the more resistance-boosted boosters you have, the less time you need to recharge your shield, and the fewer cells needed to recharge your shield.
▲ You didn’t understand a single sentence of what we calculated above? Just know that you should balance Heavy Duty with Resistances. Get a 2:1 ratio → 2 heavy for 1 resistance. Don’t forget that there is a Diminishing Return at 50% and the hard cap is fixed at 75%, so tend to bring all your resistances to 50%.
![]()
The Shield Cell Banks can be modified as well, thanks to these two Engineers.
-
- Elvira – Rang 1 à 3
-

- Lori – Rang 1 à 3
- Specialised
- Module integrity is lowered and power draw increased with this modification, in exchange for quicker boot up times and better thermal load handling. It is more effective on vessels that do not resist heat well or when the cell is much too big for the ship.
- Rapid Charge
- Increases boot up time and loses duration to gain faster spin up times and faster shield restoration when used. It can be useful on small ships as you can quickly inject more Mj to your shields. For larger vessels, the heat generated is too much compared to the Mj of refilled shields.
![]()
The shield can be reinforced or even recharged thanks to weapons! There are 2 experimental effects that increase the resistance for one and the regeneration for the other.
- Regeneration sequence
- Applicable only to the Beam laser: it reinforces the shields when aimed at an ally. The effect helps an ally in battle, but the more your ally will have a high thermal resistance, the lower the bonus will be. Maintain beam to recharge the shields of your ally.
- Concordant sequence
- Applicable on all lasers: the regeneration speed of the shield is increased, allowing a fast recharge of these. As with the previous effect, the thermal resistance of the target decreases the effectiveness of the effect. Shoot once to apply the effect for a short time.
How to counter the Shields
The experimental effects can also make the enemies’ shields ineffective or quite useless.
On Pulse and Burst lasers, the Phase Sequence effect allows a fraction of the damage to pass through the shields to directly damage the target’s hull. It’s a big pressure for the enemies with heavy shields and weak hull! The penalty is that the damage that passes through the shields no longer contribute to damage these shields. The rest of your weapons must destroy the shields for maximum damage. Against the launched fighters, it takes two or three shots to kill them.
![]()
The Railgun and Imperial Hammer (Bursting Railgun Variation) can have an experimental effect preventing the regeneration of enemy shields when deploying a cell, this is known as Feedback Cascade. The bigger the enemy ship is, the more effective it is because it is a fixed weapon. If your enemy recharge wit ha shield cell, shoot! In space, no one will ear her/him cry.
![]()
The Torpedoes have 2 ammo in Class 2, but equipped with the monstruous Reverberating Cascade, each damage on the shield with a torpedo is duplicated on the integrity of the Shield Generator! If a player has 4 of these and attacks you, even in a very heavy ship he can destroy your generator. At 300 m/s, these little beasts can destroy all your gameplay in no time, so pay attention to missile alerts.
![]()
Plasma Accelerators. They deal absolute damage and thus, have no problem biting shields. You will deal true damage.